I'm going to honor the NDA and not discuss details, however if you are a member of the XCode development program rush and download the beta version of XCode 4. It is a vast improvement over XCode 3 and seems to fix some of the major problems that I had with XCode 3, especially in comparison with Visual Studio and Eclipse. It's a separate install and won't trounce your XCode 3 install, and you can use both of them on your projects depending on your needs.
I've only scratched the surface, and I already find it very nice.
Sunday, July 25, 2010
-Release not found in protocol
I had some delegates defined as id in my code, and have been ignoring the 'release not found in protocol' errors that I get on release (and retain). I finally decided to eliminate them, I added the NSObject protocol to my protocol definition. This removed this particular warning, which is good because I want to remove all warnings (if possible) from my code.
Monday, July 19, 2010
Wall Paper Editor: Colored RGB Sliders
I have a first cut of a pretty nice RGB slider. This will work similar to how the Apple slider works in interface builder for RGB. The color sliders indicate what you will get when you change the slider.
This is a first cut, it uses a .nib file, which seems to sometimes be pesky when using a library. I would like to redo it to just do it with code.
 Here is the sample .nib file. I have a background label, and an image with an invisible label over it. I'm going to change the background color of the label as I move the text. The background label is just so you can see the transparency.
I have 4 sliders for red, green, blue and Transparency. I also have a text field to display the normalized value of the field (0-255). As each slider is moved I will change the label image, and recalculate the images for the sliders.
The code is still beta. It works for the principle but needs some cleaning up. Right now it has the following problems.

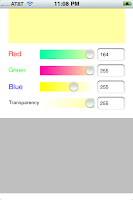
Above is the form running in three different selections. I display the current color up above, and for each slider I display a gradient showing what happens when you move that slider to the given location. This allows for a quick visual indicator of how to traverse the RGB color space.
The key to this is the use of UISlider setMinimumTrackImage and setMaximumTrackImage. Both of these routines take an image and use it. So whenever the slider is moved I calculate a gradient for all 4 sliders of what moving that slider will do. I then set the min and max images for the slider. On my iPhone 3G this runs pretty nicely, although I personally have trouble distinguishing all the colors in the gradient. The screenshot looks better actually :)
The key is that whenever a slider value is changed I go through and recalculate all 4 sliders. For each slider I assume all of the other color coordinates are going to remain constant, however that particular slider will vary from 0 to 1 (which is how CoreGraphics handles color values).
I use the slider's position to determine where my two images start and begin, as well as what the value is at that point (which since the sliders go from 0 to 1 just like colors is pretty easy).
My routine to calculate a slider takes the index of the slider and uses it.
I have two arrays of floats for colors. lcolors and rcolors for the gradient on the left and right of the slider.
Each array has 8 elements for Red, Green, Blue and Alpha for the start and end.
First I set all values equal to the current color. Only one color is varying. I could put a continue statement for the color I'm working with, but I just override it a little later.
Next I set the start and end colors for current color. I'm going to vary the left gradient from 0 to the currentValue, and the right gradient from the current value to 1.
This is a first cut, it uses a .nib file, which seems to sometimes be pesky when using a library. I would like to redo it to just do it with code.

I have 4 sliders for red, green, blue and Transparency. I also have a text field to display the normalized value of the field (0-255). As each slider is moved I will change the label image, and recalculate the images for the sliders.
The code is still beta. It works for the principle but needs some cleaning up. Right now it has the following problems.
- When the view first comes up it doesn't display the colors.
- You can't type a number into the text field.
- I really want to support reorientation of the field, and larger sliders.


Above is the form running in three different selections. I display the current color up above, and for each slider I display a gradient showing what happens when you move that slider to the given location. This allows for a quick visual indicator of how to traverse the RGB color space.
The key to this is the use of UISlider setMinimumTrackImage and setMaximumTrackImage. Both of these routines take an image and use it. So whenever the slider is moved I calculate a gradient for all 4 sliders of what moving that slider will do. I then set the min and max images for the slider. On my iPhone 3G this runs pretty nicely, although I personally have trouble distinguishing all the colors in the gradient. The screenshot looks better actually :)
The key is that whenever a slider value is changed I go through and recalculate all 4 sliders. For each slider I assume all of the other color coordinates are going to remain constant, however that particular slider will vary from 0 to 1 (which is how CoreGraphics handles color values).
I use the slider's position to determine where my two images start and begin, as well as what the value is at that point (which since the sliders go from 0 to 1 just like colors is pretty easy).
My routine to calculate a slider takes the index of the slider and uses it.
- (void) setSlider:(UISlider*) slide colorIndex:(int) colorIndex
I have two arrays of floats for colors. lcolors and rcolors for the gradient on the left and right of the slider.
Each array has 8 elements for Red, Green, Blue and Alpha for the start and end.
float lcolors[8];
float rcolors[8];
First I set all values equal to the current color. Only one color is varying. I could put a continue statement for the color I'm working with, but I just override it a little later.
for (int i=0;i<4;i++)
{
lcolors[i]=colors[i];
lcolors[i+4]=colors[i];
rcolors[i]=colors[i];
rcolors[i+4]=colors[i];
}
Next I set the start and end colors for current color. I'm going to vary the left gradient from 0 to the currentValue, and the right gradient from the current value to 1.
float currentColorValue=colors[colorIndex];
lcolors[colorIndex]=0;
lcolors[colorIndex+4]=currentColorValue;
rcolors[colorIndex]=currentColorValue;
rcolors[colorIndex+4]=1.0;
Now I calculate the left and right gradient and build an image with them. The size of the image is the portion of the slider to the left/right of the current value. (Note that I don't need a image if I'm at the left or right end).
float middlePoint=slide.bounds.size.width*currentColorValue;
CGRect leftSize=CGRectMake(0, 0, middlePoint, slide.bounds.size.height);
CGRect rightSize=CGRectMake(0, 0, slide.bounds.size.width-middlePoint, slide.bounds.size.height);
if (leftSize.size.width>1)
{
UIImage *lImage=[self createImageWithGradient:lgradient withSize:leftSize];
[slide setMinimumTrackImage:lImage forState:0];
}
if (rightSize.size.width>1)
{
UIImage *rImage=[self createImageWithGradient:rgradient withSize:rightSize];
[slide setMaximumTrackImage:rImage forState:0 ];
}
Where createImageWithGradient is:
- (UIImage*) createImageWithGradient :(CGGradientRef) gradient withSize: (CGRect)size
{
UIGraphicsBeginImageContext(size.size);
CGPoint start=CGPointMake(size.origin.x,size.origin.y+size.size.height*0.25);
CGPoint end=CGPointMake(size.origin.x+size.size.width,size.origin.y+size.size.height*0.25);
CGContextDrawLinearGradient(UIGraphicsGetCurrentContext(), gradient, start, end, 0);
UIImage *viewImage=UIGraphicsGetImageFromCurrentImageContext();
UIGraphicsEndImageContext();
return [viewImage stretchableImageWithLeftCapWidth:1 topCapHeight:1];
}
Finally release the gradients:
CGGradientRelease(lgradient);
CGGradientRelease(rgradient);
Everytime I move the slider, I calculate all the colors and fill in the text boxes:
- (void) calcColors
{
[self setSlider:redSlider colorIndex:0];
[self setSlider:greenSlider colorIndex:1];
[self setSlider:blueSlider colorIndex:2];
[self setSlider:transSlider colorIndex:3];
UIColor *currentColor=[UIColor colorWithRed:colors[0] green:colors[1] blue:colors[2] alpha:colors[3]];
self.refLabel.backgroundColor=currentColor;
self.redTextField.text=[NSString stringWithFormat:@"%d",(int) (colors[0]*255)];
self.greenTextField.text=[NSString stringWithFormat:@"%d",(int) ( colors[1]*255)];
self.blueTextField.text=[NSString stringWithFormat:@"%d",(int) (colors[2]*255)];
self.transTextField.text=[NSString stringWithFormat:@"%d",(int) ( colors[3]*255)];
}
To make my actions easier, I set the tags of the sliders and text fields equal to the color index associated with them.
For future use I want to migrate this from a view with a nib to a control that doesn't have a nib. It would make it easier to use in multiple projects. I also plan to expand it so that I can support selecting from a list of colors, and eventually from a spectrum map.
Below is the entire class, feel free to use it for your own projects. I would appreciate a attribution (Creative Commons attribution license).
The header
#import
#import
@interface ColorEditor : UIViewController {
IBOutlet UISlider *redSlider;
IBOutlet UISlider *greenSlider;
IBOutlet UISlider *blueSlider;
IBOutlet UISlider *transSlider;
IBOutlet UILabel *refLabel;
IBOutlet UITextField *redTextField;
IBOutlet UITextField *greenTextField;
IBOutlet UITextField *transTextField;
float colors[4];
CGColorSpaceRef currentColorSpace;
}
- (id) initWithColor:(UIColor *)color;
@property (nonatomic,retain) UISlider *redSlider;
@property (nonatomic,retain) UISlider *greenSlider;
@property (nonatomic,retain) UISlider *blueSlider;
@property (nonatomic,retain) UISlider *transSlider;
@property (nonatomic) CGColorSpaceRef currentColorSpace;
@property (nonatomic,retain) UILabel *refLabel;
@property (nonatomic,retain) UITextField *redTextField;
@property (nonatomic,retain) UITextField *greenTextField;
@property (nonatomic,retain) UITextField *blueTextField;
@property (nonatomic,retain) UITextField *transTextField;
- (IBAction) bob:(id) sender;
- (IBAction) sliderChanged:(id) sender;
- (UIImage*) createImageWithGradient :(CGGradientRef) gradient withSize: (CGRect)size;
- (void) setSlider:(UISlider*) slide colorIndex:(int) colorIndex;
- (void) calcColors;
@end
The source
#import "ColorEditor.h"
#import
@implementation ColorEditor
@synthesize redSlider;
@synthesize greenSlider;
@synthesize blueSlider;
@synthesize transSlider;
@synthesize currentColorSpace;
@synthesize refLabel;
@synthesize redTextField;
@synthesize greenTextField;
@synthesize blueTextField;
@synthesize transTextField;
/*
// The designated initializer. Override if you create the controller programmatically and want to perform customization that is not appropriate for viewDidLoad.
- (id)initWithNibName:(NSString *)nibNameOrNil bundle:(NSBundle *)nibBundleOrNil {
if ((self = [super initWithNibName:nibNameOrNil bundle:nibBundleOrNil])) {
// Custom initialization
}
return self;
}
*/
/*
// Implement viewDidLoad to do additional setup after loading the view, typically from a nib.
- (void)viewDidLoad {
[super viewDidLoad];
}
*/
/*
// Override to allow orientations other than the default portrait orientation.
- (BOOL)shouldAutorotateToInterfaceOrientation:(UIInterfaceOrientation)interfaceOrientation {
// Return YES for supported orientations
return (interfaceOrientation == UIInterfaceOrientationPortrait);
}
*/
- (void)didReceiveMemoryWarning {
// Releases the view if it doesn't have a superview.
[super didReceiveMemoryWarning];
// Release any cached data, images, etc that aren't in use.
}
- (void)viewDidUnload {
[super viewDidUnload];
// Release any retained subviews of the main view.
// e.g. self.myOutlet = nil;
}
- (void)dealloc {
[super dealloc];
CGColorSpaceRelease(currentColorSpace);
}
- (void) setSlider:(UISlider*) slide colorIndex:(int) colorIndex
{
float currentColorValue=colors[colorIndex];
float lcolors[8];
float rcolors[8];
for (int i=0;i<4;i++)
{
lcolors[i]=colors[i];
lcolors[i+4]=colors[i];
rcolors[i]=colors[i];
rcolors[i+4]=colors[i];
}
lcolors[colorIndex]=0;
lcolors[colorIndex+4]=currentColorValue;
rcolors[colorIndex]=currentColorValue;
rcolors[colorIndex+4]=1.0;
// Now we have two gradients
CGGradientRef lgradient = CGGradientCreateWithColorComponents(currentColorSpace, lcolors, NULL, sizeof(lcolors)/(sizeof(lcolors[0])*4));
CGGradientRef rgradient = CGGradientCreateWithColorComponents(currentColorSpace, rcolors, NULL, sizeof(rcolors)/(sizeof(rcolors[0])*4));
float middlePoint=slide.bounds.size.width*currentColorValue;
CGRect leftSize=CGRectMake(0, 0, middlePoint, slide.bounds.size.height);
CGRect rightSize=CGRectMake(0, 0, slide.bounds.size.width-middlePoint, slide.bounds.size.height);
if (leftSize.size.width>1)
{
UIImage *lImage=[self createImageWithGradient:lgradient withSize:leftSize];
[slide setMinimumTrackImage:lImage forState:0];
}
if (rightSize.size.width>1)
{
UIImage *rImage=[self createImageWithGradient:rgradient withSize:rightSize];
[slide setMaximumTrackImage:rImage forState:0 ];
}
CGGradientRelease(lgradient);
CGGradientRelease(rgradient);
}
- (UIImage*) createImageWithGradient :(CGGradientRef) gradient withSize: (CGRect)size
{
UIGraphicsBeginImageContext(size.size);
CGPoint start=CGPointMake(size.origin.x,size.origin.y+size.size.height*0.25);
CGPoint end=CGPointMake(size.origin.x+size.size.width,size.origin.y+size.size.height*0.25);
CGContextDrawLinearGradient(UIGraphicsGetCurrentContext(), gradient, start, end, 0);
UIImage *viewImage=UIGraphicsGetImageFromCurrentImageContext();
UIGraphicsEndImageContext();
return [viewImage stretchableImageWithLeftCapWidth:1 topCapHeight:1];
}
- (id) initWithColor:(UIColor *)color
{
currentColorSpace = CGColorSpaceCreateDeviceRGB();
const CGFloat *components = CGColorGetComponents(color.CGColor);
for (int i=0;i<4;i++)
{
colors[i]=components[i];
}
//[self calcColors];
return self;
}
- (void) calcColors
{
[self setSlider:redSlider colorIndex:0];
[self setSlider:greenSlider colorIndex:1];
[self setSlider:blueSlider colorIndex:2];
[self setSlider:transSlider colorIndex:3];
UIColor *currentColor=[UIColor colorWithRed:colors[0] green:colors[1] blue:colors[2] alpha:colors[3]];
self.refLabel.backgroundColor=currentColor;
self.redTextField.text=[NSString stringWithFormat:@"%d",(int) (colors[0]*255)];
self.greenTextField.text=[NSString stringWithFormat:@"%d",(int) ( colors[1]*255)];
self.blueTextField.text=[NSString stringWithFormat:@"%d",(int) (colors[2]*255)];
self.transTextField.text=[NSString stringWithFormat:@"%d",(int) ( colors[3]*255)];
}
- (IBAction) sliderChanged:(id) sender
{
UISlider *slider=(UISlider*) sender;
int colorIndex=slider.tag;
colors[colorIndex]=slider.value;
[self calcColors];
}
- (IBAction) bob:(id)sender
{
}
@end
Thursday, July 15, 2010
Otter Box case for IPad
I have an Otterbox case for my iPhone and love it, it's very protective and feels nice. I signed up for a mailing list for when OtterBox releases an iPad version. Well they have finally done so.
I purchased the defender case, and received it in the mail a couple days ago. The free shipping was very fast, it took 3 days to get to my house.
First impressions:
What you get is a film you can apply to your screen, a 2 layer case that covers most of the iPad, and a back that can either serve as a stand, or a greater protective cover to your screen. It also includes a large screen cleaning cloth, and a plastic piece to help attach the film to the screen.
The case feels very solid, and I think it will be very impact resistant. If you have the back cover over the screen it provides an air gap that should protect your screen against direct impact. The other sides are covered with rubber over a hard plastic case.
There is a back to the case that can be removed. This allows access to the power outlet and to be used as a docking station.
Pros:
Very protective
When the case is put on the front of the iPad it should allow you to put it in any bag.
The back can be used as a stand for your iPad.
Cons:
The you need to remove the small piece in the back to charge it. I would have liked a rubber plug such as my iPhone has for charging.
It's a little heavy.
Pictures will be forthcoming.
Sunday, July 11, 2010
Wallpaper Editor: Color slidebar
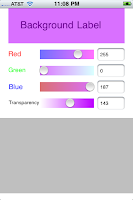
OK, I could just put up a standard slide bar and let the user set RGB values, but that is not too great for general users, and even developers can have troubles visualizing the RGB color space. Taking a look in interface builder, I see that IT's color selector is extremely nice. Lets steal some of its design. (All of its design would be too much, it packs a lot of functionality).
The sliders it has are very nice. As you change the value of one slider, the other sliders change their gradient so that they show the possible values:
 The iphone editor has 4 different types of sliders RGB, grey scale, CMYK, HSB. In addition it has the ability to select from an image, to select 'crayons', to select a list of names, etc...
The opacity button allows the Alpha to be set. I was originally going to call mine 'transparency', but Opacity works as well. Either way using Alpha is something only computer geeks will use. As the alpha is set, a combination of black and white is displayed behind color sample.
I plan to implement RGB sliders in a similar fashion and maybe a list of names for my initial cut. If I do it right I should be able to support the other color spaces. Right now I think giving too many color spaces might confuse people.
The first implementation is to create a single slide bar that takes an object that helps set the color gradient for that slider.
My sliders will not have the ability to specify a full 256 values for color. The iphone's UI doesn't really let this happen unless I force the sliders to be landscape, and get picky about colors. However I should be able to support increments of 10, and to possibly have a 'zoom down' mode where you get to the general vicinity and then choose a specific number.
If you collapse the Apple dialog then it will not allow you to choose every number.
Note that for my final version I might want to do HSV instead of RGB, it might be easier for the general user to find a color using that model.
The sliders it has are very nice. As you change the value of one slider, the other sliders change their gradient so that they show the possible values:

The opacity button allows the Alpha to be set. I was originally going to call mine 'transparency', but Opacity works as well. Either way using Alpha is something only computer geeks will use. As the alpha is set, a combination of black and white is displayed behind color sample.
I plan to implement RGB sliders in a similar fashion and maybe a list of names for my initial cut. If I do it right I should be able to support the other color spaces. Right now I think giving too many color spaces might confuse people.
The first implementation is to create a single slide bar that takes an object that helps set the color gradient for that slider.
My sliders will not have the ability to specify a full 256 values for color. The iphone's UI doesn't really let this happen unless I force the sliders to be landscape, and get picky about colors. However I should be able to support increments of 10, and to possibly have a 'zoom down' mode where you get to the general vicinity and then choose a specific number.
If you collapse the Apple dialog then it will not allow you to choose every number.
Note that for my final version I might want to do HSV instead of RGB, it might be easier for the general user to find a color using that model.
Wall paper Editor: Current state
OK, I started my wallpaper editor a while ago and created a bunch of posts but didn't publish them, because I wanted things in a more stable state. I now have a semi decent application, but it certainly needs more work. I've published all my old posts, and uploaded the current source to
http://bitbucket.org/jlundy/wallpapereditor
Current features
http://bitbucket.org/jlundy/wallpapereditor
Current features
- I can place multiple text items on the screen and move them around
- I can select an item, causing it to scroll to visibility, and display a toolbar over the keyboard for that item.
- I can pinch to change the size of items.
Needed features:
- Next I need a color editor, something that allows me to select foreground and background colors.
- I need to change the text so that it can be resized, either automatically or manually.
- I need to port it to the ipad.
Wallpaper Editor: Adding a toolbar with the keyboard
Safari uses a toolbar directly over the keyboard. I would like to do the same in a generic fashion. The idea is that when the keyboard is displayed, I'll move a toolbar directly over the top of the keyboard. I already have a routine that will move a view to expose items over the keyboard, so this is just an extension of this.
One additional characteristic is that I want to have the option of choosing if I move the view to avoid the toolbar, or if I count the toolbar as part of the view.
For now I'm going to assume that the toolbar will only be present when the keyboard is present, and will disappear when it is not present. This seems like an intuitive behavior, and is how safari acts.
I modify my KeyboardHelper class so that it has an additional properties:
UIToolbar *toolbar // a toolbar to display (if this is not null).
I then modified my view display and remove so that the toolbar is either removed or displayed.
At the top I calculate the toolbar size, and set an offset.
int toolbarLocation=0;
int toolbarOffset=0;
if (toolbar!=nil)
{
toolbarOffset=toolbar.frame.size.height;
toolbarLocation=myFrame.origin.y+ myFrame.size.height-bounds.size.height-toolbarOffset;
}
Then when moving the views, I also use the toolbarOffset to move them. It is either zero if no toolbar, or the size of the toolbar.
For the first case of resizing the view, I use it directly.
view.frame=CGRectMake(myFrame.origin.x,myFrame.origin.y,myFrame.size.width,
myFrame.size.height-bounds.size.height-toolbarOffset);
And for the second case of moving my view, I move it a little extra.
bounds.origin.y = view.window.frame.size.height-bounds.size.height-toolbarOffset;
toolbarLocation=view.window.frame.size.height- bounds.size.height-toolbarOffset;
I set an animation boolean if I'm starting an animation for my resize and then I go ahead and display the toolbar when the keyboard shows up.
if (toolbar!=nil)
{
if (!inAnim)
{
inAnim=true;
[UIView beginAnimations:nil context:view.superview];
[UIView setAnimationCurve:UIViewAnimationCurveEaseIn];
[UIView setAnimationDuration:0.15];
}
toolbar.frame=CGRectMake(toolbar.frame.origin.x,toolbarLocation,toolbar.frame.size.width,toolbar.frame.size.height);
[view.window addSubview:toolbar];
}
if (inAnim)
{
[UIView commitAnimations];
}
Finally in keyboard disappearing, I remove my view if it is present.
Note I really don't have to check for nil, you can send a message to nil, but I think its good form to always check for nil, that way I don't start using a property (which will crash).
- (void)keyboardDisappearing:(NSNotification *)notification {
if (!useCenter)
view.frame=originalSize;
else {
[UIView beginAnimations:nil context:view.superview];
[UIView setAnimationCurve:UIViewAnimationCurveEaseIn];
[UIView setAnimationDuration:0.15];
view.superview.frame=originalSize;
[UIView commitAnimations];
if (toolbar!=nil)
{
[toolbar removeFromSuperview];
}
}
}
Wallpaper Editor: Creating a data model
The next step is to create a data model that indicates allows for persistence of data. In this case I have the idea of a hierarchical data structure, with common elements. In this case we have
The wall paper set is a collection of WallPaperInfo items that is named. The eventual goal is to have multiple sets which the user can select between and use.
The wallpaper style defines the appearance of the wall paper info. It includes font, font size, font color, background color, alpha etc.. This is a named style so that you can quickly select between different styles, as well as creating new styles on the fly.
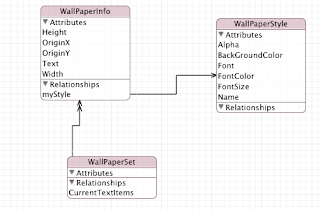 The wallpaper info always lives within a set. The style however is independent, they can exist without a wallpaper info, and can belong to multiple wallpaper infos.
WallPaperInfo
The wallpaper info is the basic text information block that is present in a particular point on the screen. This is what the user interacts with directly. It has a rectangle (size and origin), as well as the text and style.
WallPaper Sets
The wall paper set is a collection of WallPaperInfo items that is named. The eventual goal is to have multiple sets which the user can select between and use.
WallPaperStyle
The wallpaper style defines the appearance of the wall paper info. It includes font, font size, font color, background color, alpha etc.. This is a named style so that you can quickly select between different styles, as well as creating new styles on the fly.

Subscribe to:
Posts (Atom)