OK, I've been working (slowly) over the last month on refactoring my flow, but I'm not ready to post stuff. However I decided that I was going to download the Unreal Development Kit and see if I could get 'Epic Citadel' to compile and install my own version. Step 1 is to boot up a windows box and download the development kit. It's a 1.1 GB download.
The UDK is Windows only, but interestingly enough it can send data directly to your iphone for testing and running. For submission to the developer program you need to use your Mac. I'm not sure if that means you can't use Objective-C stuff directly in it, probably not.
It was trivially easy to get stuff running on the iPhone. I installed the application, started the Mobile Editor, and used their sample map. I then ran play install on iOS device, and it prompted me for my provisioning certificate, my developer certificate and for some plist information. I just moved those over from my mac, and boom I had a level running on my iPhone 4.
I don't have much knowledge of the unreal editor, I played with the very first version when Unreal first came out. It looks like a non-trivial learning curve, however for those with skills creating models, textures and scripting, I think getting a really nice game has just become a lot easier. I look forward to a good game in the Epic Citadel map. (If I read their licensing terms correctly, you can use those models in your game, your milage may vary, I'm not a lawyer.) (Infinity blade is OK, but not my style of game).
Epic did a great job of getting a third party editor working with iOS. I'm sure there are pitfalls in moving forward with a real game, but the first impressions are VERY impressive.
(Epic requires the following text when writing documentation about using the Unreal Development Kit, since they are providing this for FREE, I think it's quite reasonable to comply with their legal requirements.)
Note this blog post is not endorsed by Epic games.
Unreal Development Kit (UDK) © 2009, Epic Games, Inc. Epic, Epic Games, Gears of War, Gears of War 2, Unreal, AnimSet Viewer, AnimTree Editor, Unreal Cascade, Unreal Content Browser, Unreal Development Kit, Unreal Editor, Unreal Engine, Unreal Kismet, Unreal Lightmass, Unreal Matinee, Unreal PhAT, UnrealScript and Unreal Tournament are trademarks or registered trademarks of Epic Games, Inc. in the United States of America and elsewhere. All other trademarks are the pr
Friday, December 17, 2010
Monday, October 25, 2010
Cloud Storage Dropbox vs Sugarsync
Recenlty I started thinking about backups and decided to use cloud storage to help keep things up to date. Right now I'm testing two services out to see how they work. I'm using the free version, source is pretty small, but might upgrade to a paid service if its good enough.
The two services I'm testing are Dropbox and sugarsync.
Dropbox
Dropbox is one of the most common ones out there. You establish a single directory on your system and then the dropbox application will monitor that directory and sync any files found to the cloud and other computers.
It's easy to set up, and comes with a 2GB initial size.
If I refer someone to dropbox both that person and myself get an extra 250 MB of space (up to an 8GB max). I should have found a referral link before signing up.
If you want a referral link, just follow:
Dropbox referal link
The iphone client is pretty nice and will even let you view your source files.
Sugarsync
This got good reviews and has one major advantage over dropbox. It can share ANY directory on your system. This is pretty good. In addition if some one is referral to the service by you, you and that person get 500 mb of extra space (not bad) really. 2 GB for free out of the box, another 500 mb for playing with it a little bit, and then one extra person signing up for a free account gives you 500 mb, with no upper limit.
If you are want to try it out follow this link:
Sugarsync referral
I wish I had found a referral link prior to signing up, it would have been extra space :)
Right now I'm trying out both DropBox and Sugarsync on the same files in the same directory. This is a nice dual redundant backup, and I can see how they work for me.
The iphone client lets you stream music, and view photos but doesn't let you view other files like DropBox does. I like the space and flexibility however.
The nice things about these is the service runs in the background and updates your files as you change them. They can even track history for you. Painless source control. Of course I would still run a real repository, but this is a good 'backup'.
I plan to run both services in parallel for a while to see which I like better.
Thursday, September 16, 2010
Capturing part of an image from a UIImageView
I have a set of views over a picture and I wanted to pick the part of the picture under the views. I found some code on stack overflow that helped me extract the part of the photo I wanted, however when I used it, it seemed to be scaled improperly and showed up strangely.
I finally figured out that the reason was because the UIImageView scales the image, and I was using the view coordinates of the part I was interested to try and get the subimage from the picture. This means that when I'm choosing a number from 0-320 in the view and grabbing those coordinates from a 1200x1600 image. This meant that I was always in the top left part of the picture.
The following code seems pretty close (it might still be a little off) but at least it grabs stuff in the right vicinity. I wanted to solve this problem even though I'm currently planning to actually abandon the 'grab' screen and put on separate dialog approach. Instead I'm going to create an overlay and place it on top of the current view, allowing precise dynamic changes to occur.
- (UIImage*) getView:(CGRect )area
{
if (self.image==nil)
return nil;
if (self.image.image==nil)
return nil;
UIGraphicsBeginImageContext(area.size);
// we are using aspect fit, so we will be using which ever is the larger of these two scale factors.
float widthScaleFactor=self.image.bounds.size.width/self.image.image.size.width;
float heightScaleFactor=self.image.bounds.size.height/self.image.image.size.height;
float scaleFactor=widthScaleFactor;
NSLog(@"scale factors are height=%f width=%f",widthScaleFactor,heightScaleFactor);
if (widthScaleFactor
scaleFactor=heightScaleFactor;
CGRect drawRect=CGRectMake(-area.origin.x/scaleFactor, -area.origin.y/scaleFactor,
self.image.image.size.width,self.image.image.size.height);
UIImageOrientation currentOrient=self.image.image.imageOrientation;
CGRect destRect=CGRectMake(0, 0, area.size.width, area.size.height);
CGContextRef context=UIGraphicsGetCurrentContext();
CGContextClipToRect(context, destRect);
[self.image.image drawInRect:drawRect];
UIImage* im=UIGraphicsGetImageFromCurrentImageContext();
UIGraphicsEndImageContext();
return im;
}
Colored RGB sliders, without a XIB
The next step of my refactoring was to modify the Colored View sliders so that they are independent of a .xib file so that I can place them into any view. This gives me a lot of flexibility and reduces some of the dependance of a xib in a dependent library.
In addition I found that when I programmatically created the sliders I could change the height and make it look somewhat nicer.
I revised the creation code so that it creates 4 sliders programmatically spaced within a passed in view. It sets up callbacks in the current routine.
When a color changes it calls a delegate with the changes.
- (void) loadView : (UIView *)viewToUse
{
NSLog(@"In loadView for ColorEditor");
// Don't use a nib.
self.leftMargin=10;
self.rightMargin=10;
self.spacing=5;
self.fontSize=10;
int labelWidth=74;
int labelHeight=21;
viewToUse.backgroundColor=[UIColor cyanColor];
if (currentColorSpace==nil)
currentColorSpace = CGColorSpaceCreateDeviceRGB();
NSArray *sliderLabels= [NSArray arrayWithObjects:NSLocalizedString(@"Red", @"Red"), NSLocalizedString(@"Green", @"Green"), NSLocalizedString(@"Blue", @"Blue"),NSLocalizedString(@"Transparency","Transparency"), nil];
NSLog(@"view height %f, width %f x %f, y %f",viewToUse.frame.size.height,viewToUse.frame.size.width,viewToUse.frame.origin.x,viewToUse.frame.origin.y);
int sliderHeight=(viewToUse.frame.size.height)/4-spacing;
NSLog(@"SliderHeight %d",sliderHeight);
for (int i=0;i<4;i++)
{
CGRect labelFrame=CGRectMake(0, (sliderHeight+spacing)*i+sliderHeight/2-labelHeight/2, labelWidth, labelHeight);
UILabel *label=[[UILabel alloc] initWithFrame:labelFrame];
label.adjustsFontSizeToFitWidth=true;
label.text=[sliderLabels objectAtIndex:i];
[viewToUse addSubview:label];
CGRect areaFrame=CGRectMake(leftMargin+labelWidth, (sliderHeight+spacing)*i,viewToUse.bounds.size.width-leftMargin-rightMargin-labelWidth, sliderHeight);
sliders[i]=[[UISlider alloc]init];
[sliders[i] addTarget:self action:@selector(sliderChanged:) forControlEvents:UIControlEventValueChanged];
sliders[i].tag=i;
sliders[i].accessibilityLabel=[sliderLabels objectAtIndex:i];
NSLog(@"Y is %d",(sliderHeight+spacing)*i);
sliders[i].frame=areaFrame;
[viewToUse addSubview:sliders[i]];
}
[self calcColors];
}
and the calc colors is:
- (void) calcColors
{
for (int index=0;index<4;index++)
{
[self setSlider:sliders[index] colorIndex:index];
}
currentColor=[UIColor colorWithRed:colors[0] green:colors[1] blue:colors[2] alpha:colors[3]];
for (int index=0;index<4;index++)
{
// numeric fields are not implemented.
// textFields[index].text=[NSString stringWithFormat:@"%d",(int) (colors[index]*255)];
}
if (delegate!=nil)
{
[delegate colorChanged:currentColor];
}
}
This looks like:
Note that the sliders (the area in blue) is the only thing the code does. The rest is a custom frame done in a .nib. This enables me to embed the sliders in a view:
The .nib in interface builder looks like this:

Note that I have an image view under a label. This allows me to change the label and show what it looks like under the label.
The yellow area is my current color for the slider view. I set it to a unique color so that I can watch what is going on.
I'm allowing the font and background color to be set using the tab bar. This is not standard behavior for a tab bar, but it is allowable in a modal dialog. I have a 3rd tab that will eventually be used for a font choice.
The code for this is:
// Implement viewDidLoad to do additional setup after loading the view, typically from a nib.
- (void)viewDidLoad {
[super viewDidLoad];
colorEditor=[[ColorEditor alloc]init];
isFont=true;
self.view.backgroundColor=[UIColor colorWithRed:0 green:0 blue:0 alpha:0];
}
- (void) initColors:(UIColor*) fColor background:(UIColor*) back text:(NSString*) textValue image:(UIImage*)background {
[colorEditor loadView:actionView];
colorEditor.delegate=self;
label.textColor=fColor;
label.backgroundColor=back;
label.text=textValue;
[colorEditor setCurrentColor:label.textColor];
backImage.contentMode=UIViewContentModeScaleAspectFit;
backImage.image=background;
}
- (void) colorChanged:(UIColor*) newColor
{
if (isFont)
label.textColor=newColor;
else
label.backgroundColor=newColor;
// Tell our delegate that we have our font colors changed.
[delegate styleChanged:label.textColor background:label.backgroundColor];
}
- (void)tabBar:(UITabBar *)tabBar didSelectItem:(UITabBarItem *)item // called when a new view is selected by the user (but not programatically)
{
if (item==fontColor)
{
isFont=true;
[colorEditor setCurrentColor:label.textColor];
}
else
{
isFont=false;
[colorEditor setCurrentColor:label.backgroundColor];
}
if (label !=nil)
{
label.text=item.title;
}
}
@end
I can now change the color editor and use it to set both the background and foreground color of a font.
And the header for this defines another protocol that allows the foreground and background color to be set.
@protocol StyleChanged
- (void) styleChanged:(UIColor*) fontColor background:(UIColor*) backColor;
@end
@interface ColorEdit : UIViewController<UITabBarDelegate,ColorListener> {
IBOutlet UILabel *label;
IBOutlet UIView *actionView;
IBOutlet UIImageView *backImage;
ColorEditor *colorEditor;
IBOutlet UITabBarItem *fontColor;
IBOutlet UITabBarItem *backColor;
bool isFont;
id<StyleChanged> delegate;
}
@property (nonatomic,retain) IBOutlet UIImageView *backImage;
@property (nonatomic,retain) IBOutlet UILabel *label;
@property (nonatomic,retain) IBOutlet UIView *actionView;
@property (nonatomic,retain) ColorEditor *colorEditor;
@property (nonatomic,retain) IBOutlet UITabBarItem *fontColor;
@property (nonatomic,retain) IBOutlet UITabBarItem *backColor;
@property (nonatomic,retain) id delegate;
- (void) initColors : (UIColor*) fontColor background:(UIColor*) back text:(NSString*) textValue image:(UIImage*)background ;
Friday, September 10, 2010
Programmatically adding views to fit view not working
I was attempting to modify my sliders so that I add the programmatically to fit the available space. In doing so I was taking an input view and calculating the size that the 4 bars should be to fill up the available space. I was running into a problem that they weren't displaying correctly. The bottom bar was always running over.
The weird thing was that all the logging showed that it was working. I finally figured out that the navigation bar at the top seemed to be messing me up. I was calculating my view sizes prior to pushing them onto the navigation stack, and that was compressing the data.
The code that calculates and populates my slider where viewToUse is a parameter:
this is done with the loadView command:
NSLog(@"view height %f, width %f x %f, y %f",viewToUse.frame.size.height,viewToUse.frame.size.width,viewToUse.frame.origin.x,viewToUse.frame.origin.y);
int sliderHeight=(viewToUse.frame.size.height)/4-spacing;
NSLog(@"SliderHeight %d",sliderHeight);
for (int i=0;i<4;i++)
{
CGRect labelFrame=CGRectMake(0, (sliderHeight+spacing)*i+sliderHeight/2-labelHeight/2, labelWidth, labelHeight);
UILabel *label=[[UILabel alloc] initWithFrame:labelFrame];
label.adjustsFontSizeToFitWidth=true;
label.text=[sliderLabels objectAtIndex:i];
[viewToUse addSubview:label];
CGRect areaFrame=CGRectMake(leftMargin+labelWidth, (sliderHeight+spacing)*i,viewToUse.bounds.size.width-leftMargin-rightMargin-labelWidth, sliderHeight);
sliders[i]=[[UISlider alloc]init];
[sliders[i] addTarget:self action:@selector(sliderChanged:) forControlEvents:UIControlEventValueChanged];
sliders[i].tag=i;
sliders[i].accessibilityLabel=[sliderLabels objectAtIndex:i];
NSLog(@"Y is %d",(sliderHeight+spacing)*i);
sliders[i].frame=areaFrame;
[viewToUse addSubview:sliders[i]];
}
This precise code looks very different depending on how my view is initialized:
With a navigation bar:

NSLog(@"Select color chosen");
[self.textView resignFirstResponder];
ColorEdit *colorEditor=[[ColorEdit alloc] init];
[self.navController pushViewController:colorEditor animated:true];
[self.navController setNavigationBarHidden:false ];
And with this, (no navigation bar)

self.textView resignFirstResponder];
ColorEdit *colorEditor=[[ColorEdit alloc] init];
[self.navController pushViewController:colorEditor animated:true];
[self.navController setNavigationBarHidden:true ];
Finally I moved the initialization to another function instead of when the view loads and call this.

NSLog(@"Select color chosen");
[self.textView resignFirstResponder];
ColorEdit *colorEditor=[[ColorEdit alloc] init];
[self.navController pushViewController:colorEditor animated:true];
[self.navController setNavigationBarHidden:false ];
[colorEditor initColors];
Note that this changes the size of the view, probably because it autoresizes then the navigation bar is added.
With the navigation bar it is 241 pixels high. Without the navigation bar it is 285 pixels high.
The lesson is that when programmatically filling in a view, pay attention to WHEN you do it. If you are going to have other items hanging around check to see if those are changing the heights of your views. This might throw off your results. This particular one cost me several hours of debugging, since I was sure my math was correct.
Friday, September 3, 2010
Back from a long absence
I've been taking a break and trying to get back into iphone development. I decided my wall paper editor needed a navigation controller. This turned out nastier than I thought. XCode 4 has some problems with user interface editing, and I also forgot what I was doing.
What I had to do to retrofit a navigation controller onto my existing project.
What I had to do to retrofit a navigation controller onto my existing project.
- Add a navigation controller to my main window
- Add my main I was using as the view in the navigation controller. You have to set both the nib and the class to your class.
- Add a navigation controller outlet to my application delegate.
- Connect my navigation controller to that outlet.
- Modify the main of the delegate to do the following:
[window addSubview:rootViewController.view];
where rootViewController is:
@property (nonatomic, retain) IBOutlet UINavigationController *rootViewController;
I spent more time than I care to think doing this, I would miss one step or another and things would just not work. It was useful practice to wire the thing together, but it ate a lot of time.
Sunday, July 25, 2010
XCode 4
I'm going to honor the NDA and not discuss details, however if you are a member of the XCode development program rush and download the beta version of XCode 4. It is a vast improvement over XCode 3 and seems to fix some of the major problems that I had with XCode 3, especially in comparison with Visual Studio and Eclipse. It's a separate install and won't trounce your XCode 3 install, and you can use both of them on your projects depending on your needs.
I've only scratched the surface, and I already find it very nice.
I've only scratched the surface, and I already find it very nice.
-Release not found in protocol
I had some delegates defined as id in my code, and have been ignoring the 'release not found in protocol' errors that I get on release (and retain). I finally decided to eliminate them, I added the NSObject protocol to my protocol definition. This removed this particular warning, which is good because I want to remove all warnings (if possible) from my code.
Monday, July 19, 2010
Wall Paper Editor: Colored RGB Sliders
I have a first cut of a pretty nice RGB slider. This will work similar to how the Apple slider works in interface builder for RGB. The color sliders indicate what you will get when you change the slider.
This is a first cut, it uses a .nib file, which seems to sometimes be pesky when using a library. I would like to redo it to just do it with code.
 Here is the sample .nib file. I have a background label, and an image with an invisible label over it. I'm going to change the background color of the label as I move the text. The background label is just so you can see the transparency.
I have 4 sliders for red, green, blue and Transparency. I also have a text field to display the normalized value of the field (0-255). As each slider is moved I will change the label image, and recalculate the images for the sliders.
The code is still beta. It works for the principle but needs some cleaning up. Right now it has the following problems.

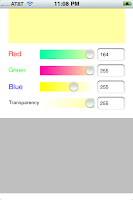
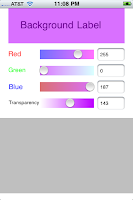
Above is the form running in three different selections. I display the current color up above, and for each slider I display a gradient showing what happens when you move that slider to the given location. This allows for a quick visual indicator of how to traverse the RGB color space.
The key to this is the use of UISlider setMinimumTrackImage and setMaximumTrackImage. Both of these routines take an image and use it. So whenever the slider is moved I calculate a gradient for all 4 sliders of what moving that slider will do. I then set the min and max images for the slider. On my iPhone 3G this runs pretty nicely, although I personally have trouble distinguishing all the colors in the gradient. The screenshot looks better actually :)
The key is that whenever a slider value is changed I go through and recalculate all 4 sliders. For each slider I assume all of the other color coordinates are going to remain constant, however that particular slider will vary from 0 to 1 (which is how CoreGraphics handles color values).
I use the slider's position to determine where my two images start and begin, as well as what the value is at that point (which since the sliders go from 0 to 1 just like colors is pretty easy).
My routine to calculate a slider takes the index of the slider and uses it.
I have two arrays of floats for colors. lcolors and rcolors for the gradient on the left and right of the slider.
Each array has 8 elements for Red, Green, Blue and Alpha for the start and end.
First I set all values equal to the current color. Only one color is varying. I could put a continue statement for the color I'm working with, but I just override it a little later.
Next I set the start and end colors for current color. I'm going to vary the left gradient from 0 to the currentValue, and the right gradient from the current value to 1.
This is a first cut, it uses a .nib file, which seems to sometimes be pesky when using a library. I would like to redo it to just do it with code.

I have 4 sliders for red, green, blue and Transparency. I also have a text field to display the normalized value of the field (0-255). As each slider is moved I will change the label image, and recalculate the images for the sliders.
The code is still beta. It works for the principle but needs some cleaning up. Right now it has the following problems.
- When the view first comes up it doesn't display the colors.
- You can't type a number into the text field.
- I really want to support reorientation of the field, and larger sliders.


Above is the form running in three different selections. I display the current color up above, and for each slider I display a gradient showing what happens when you move that slider to the given location. This allows for a quick visual indicator of how to traverse the RGB color space.
The key to this is the use of UISlider setMinimumTrackImage and setMaximumTrackImage. Both of these routines take an image and use it. So whenever the slider is moved I calculate a gradient for all 4 sliders of what moving that slider will do. I then set the min and max images for the slider. On my iPhone 3G this runs pretty nicely, although I personally have trouble distinguishing all the colors in the gradient. The screenshot looks better actually :)
The key is that whenever a slider value is changed I go through and recalculate all 4 sliders. For each slider I assume all of the other color coordinates are going to remain constant, however that particular slider will vary from 0 to 1 (which is how CoreGraphics handles color values).
I use the slider's position to determine where my two images start and begin, as well as what the value is at that point (which since the sliders go from 0 to 1 just like colors is pretty easy).
My routine to calculate a slider takes the index of the slider and uses it.
- (void) setSlider:(UISlider*) slide colorIndex:(int) colorIndex
I have two arrays of floats for colors. lcolors and rcolors for the gradient on the left and right of the slider.
Each array has 8 elements for Red, Green, Blue and Alpha for the start and end.
float lcolors[8];
float rcolors[8];
First I set all values equal to the current color. Only one color is varying. I could put a continue statement for the color I'm working with, but I just override it a little later.
for (int i=0;i<4;i++)
{
lcolors[i]=colors[i];
lcolors[i+4]=colors[i];
rcolors[i]=colors[i];
rcolors[i+4]=colors[i];
}
Next I set the start and end colors for current color. I'm going to vary the left gradient from 0 to the currentValue, and the right gradient from the current value to 1.
float currentColorValue=colors[colorIndex];
lcolors[colorIndex]=0;
lcolors[colorIndex+4]=currentColorValue;
rcolors[colorIndex]=currentColorValue;
rcolors[colorIndex+4]=1.0;
Now I calculate the left and right gradient and build an image with them. The size of the image is the portion of the slider to the left/right of the current value. (Note that I don't need a image if I'm at the left or right end).
float middlePoint=slide.bounds.size.width*currentColorValue;
CGRect leftSize=CGRectMake(0, 0, middlePoint, slide.bounds.size.height);
CGRect rightSize=CGRectMake(0, 0, slide.bounds.size.width-middlePoint, slide.bounds.size.height);
if (leftSize.size.width>1)
{
UIImage *lImage=[self createImageWithGradient:lgradient withSize:leftSize];
[slide setMinimumTrackImage:lImage forState:0];
}
if (rightSize.size.width>1)
{
UIImage *rImage=[self createImageWithGradient:rgradient withSize:rightSize];
[slide setMaximumTrackImage:rImage forState:0 ];
}
Where createImageWithGradient is:
- (UIImage*) createImageWithGradient :(CGGradientRef) gradient withSize: (CGRect)size
{
UIGraphicsBeginImageContext(size.size);
CGPoint start=CGPointMake(size.origin.x,size.origin.y+size.size.height*0.25);
CGPoint end=CGPointMake(size.origin.x+size.size.width,size.origin.y+size.size.height*0.25);
CGContextDrawLinearGradient(UIGraphicsGetCurrentContext(), gradient, start, end, 0);
UIImage *viewImage=UIGraphicsGetImageFromCurrentImageContext();
UIGraphicsEndImageContext();
return [viewImage stretchableImageWithLeftCapWidth:1 topCapHeight:1];
}
Finally release the gradients:
CGGradientRelease(lgradient);
CGGradientRelease(rgradient);
Everytime I move the slider, I calculate all the colors and fill in the text boxes:
- (void) calcColors
{
[self setSlider:redSlider colorIndex:0];
[self setSlider:greenSlider colorIndex:1];
[self setSlider:blueSlider colorIndex:2];
[self setSlider:transSlider colorIndex:3];
UIColor *currentColor=[UIColor colorWithRed:colors[0] green:colors[1] blue:colors[2] alpha:colors[3]];
self.refLabel.backgroundColor=currentColor;
self.redTextField.text=[NSString stringWithFormat:@"%d",(int) (colors[0]*255)];
self.greenTextField.text=[NSString stringWithFormat:@"%d",(int) ( colors[1]*255)];
self.blueTextField.text=[NSString stringWithFormat:@"%d",(int) (colors[2]*255)];
self.transTextField.text=[NSString stringWithFormat:@"%d",(int) ( colors[3]*255)];
}
To make my actions easier, I set the tags of the sliders and text fields equal to the color index associated with them.
For future use I want to migrate this from a view with a nib to a control that doesn't have a nib. It would make it easier to use in multiple projects. I also plan to expand it so that I can support selecting from a list of colors, and eventually from a spectrum map.
Below is the entire class, feel free to use it for your own projects. I would appreciate a attribution (Creative Commons attribution license).
The header
#import
#import
@interface ColorEditor : UIViewController {
IBOutlet UISlider *redSlider;
IBOutlet UISlider *greenSlider;
IBOutlet UISlider *blueSlider;
IBOutlet UISlider *transSlider;
IBOutlet UILabel *refLabel;
IBOutlet UITextField *redTextField;
IBOutlet UITextField *greenTextField;
IBOutlet UITextField *transTextField;
float colors[4];
CGColorSpaceRef currentColorSpace;
}
- (id) initWithColor:(UIColor *)color;
@property (nonatomic,retain) UISlider *redSlider;
@property (nonatomic,retain) UISlider *greenSlider;
@property (nonatomic,retain) UISlider *blueSlider;
@property (nonatomic,retain) UISlider *transSlider;
@property (nonatomic) CGColorSpaceRef currentColorSpace;
@property (nonatomic,retain) UILabel *refLabel;
@property (nonatomic,retain) UITextField *redTextField;
@property (nonatomic,retain) UITextField *greenTextField;
@property (nonatomic,retain) UITextField *blueTextField;
@property (nonatomic,retain) UITextField *transTextField;
- (IBAction) bob:(id) sender;
- (IBAction) sliderChanged:(id) sender;
- (UIImage*) createImageWithGradient :(CGGradientRef) gradient withSize: (CGRect)size;
- (void) setSlider:(UISlider*) slide colorIndex:(int) colorIndex;
- (void) calcColors;
@end
The source
#import "ColorEditor.h"
#import
@implementation ColorEditor
@synthesize redSlider;
@synthesize greenSlider;
@synthesize blueSlider;
@synthesize transSlider;
@synthesize currentColorSpace;
@synthesize refLabel;
@synthesize redTextField;
@synthesize greenTextField;
@synthesize blueTextField;
@synthesize transTextField;
/*
// The designated initializer. Override if you create the controller programmatically and want to perform customization that is not appropriate for viewDidLoad.
- (id)initWithNibName:(NSString *)nibNameOrNil bundle:(NSBundle *)nibBundleOrNil {
if ((self = [super initWithNibName:nibNameOrNil bundle:nibBundleOrNil])) {
// Custom initialization
}
return self;
}
*/
/*
// Implement viewDidLoad to do additional setup after loading the view, typically from a nib.
- (void)viewDidLoad {
[super viewDidLoad];
}
*/
/*
// Override to allow orientations other than the default portrait orientation.
- (BOOL)shouldAutorotateToInterfaceOrientation:(UIInterfaceOrientation)interfaceOrientation {
// Return YES for supported orientations
return (interfaceOrientation == UIInterfaceOrientationPortrait);
}
*/
- (void)didReceiveMemoryWarning {
// Releases the view if it doesn't have a superview.
[super didReceiveMemoryWarning];
// Release any cached data, images, etc that aren't in use.
}
- (void)viewDidUnload {
[super viewDidUnload];
// Release any retained subviews of the main view.
// e.g. self.myOutlet = nil;
}
- (void)dealloc {
[super dealloc];
CGColorSpaceRelease(currentColorSpace);
}
- (void) setSlider:(UISlider*) slide colorIndex:(int) colorIndex
{
float currentColorValue=colors[colorIndex];
float lcolors[8];
float rcolors[8];
for (int i=0;i<4;i++)
{
lcolors[i]=colors[i];
lcolors[i+4]=colors[i];
rcolors[i]=colors[i];
rcolors[i+4]=colors[i];
}
lcolors[colorIndex]=0;
lcolors[colorIndex+4]=currentColorValue;
rcolors[colorIndex]=currentColorValue;
rcolors[colorIndex+4]=1.0;
// Now we have two gradients
CGGradientRef lgradient = CGGradientCreateWithColorComponents(currentColorSpace, lcolors, NULL, sizeof(lcolors)/(sizeof(lcolors[0])*4));
CGGradientRef rgradient = CGGradientCreateWithColorComponents(currentColorSpace, rcolors, NULL, sizeof(rcolors)/(sizeof(rcolors[0])*4));
float middlePoint=slide.bounds.size.width*currentColorValue;
CGRect leftSize=CGRectMake(0, 0, middlePoint, slide.bounds.size.height);
CGRect rightSize=CGRectMake(0, 0, slide.bounds.size.width-middlePoint, slide.bounds.size.height);
if (leftSize.size.width>1)
{
UIImage *lImage=[self createImageWithGradient:lgradient withSize:leftSize];
[slide setMinimumTrackImage:lImage forState:0];
}
if (rightSize.size.width>1)
{
UIImage *rImage=[self createImageWithGradient:rgradient withSize:rightSize];
[slide setMaximumTrackImage:rImage forState:0 ];
}
CGGradientRelease(lgradient);
CGGradientRelease(rgradient);
}
- (UIImage*) createImageWithGradient :(CGGradientRef) gradient withSize: (CGRect)size
{
UIGraphicsBeginImageContext(size.size);
CGPoint start=CGPointMake(size.origin.x,size.origin.y+size.size.height*0.25);
CGPoint end=CGPointMake(size.origin.x+size.size.width,size.origin.y+size.size.height*0.25);
CGContextDrawLinearGradient(UIGraphicsGetCurrentContext(), gradient, start, end, 0);
UIImage *viewImage=UIGraphicsGetImageFromCurrentImageContext();
UIGraphicsEndImageContext();
return [viewImage stretchableImageWithLeftCapWidth:1 topCapHeight:1];
}
- (id) initWithColor:(UIColor *)color
{
currentColorSpace = CGColorSpaceCreateDeviceRGB();
const CGFloat *components = CGColorGetComponents(color.CGColor);
for (int i=0;i<4;i++)
{
colors[i]=components[i];
}
//[self calcColors];
return self;
}
- (void) calcColors
{
[self setSlider:redSlider colorIndex:0];
[self setSlider:greenSlider colorIndex:1];
[self setSlider:blueSlider colorIndex:2];
[self setSlider:transSlider colorIndex:3];
UIColor *currentColor=[UIColor colorWithRed:colors[0] green:colors[1] blue:colors[2] alpha:colors[3]];
self.refLabel.backgroundColor=currentColor;
self.redTextField.text=[NSString stringWithFormat:@"%d",(int) (colors[0]*255)];
self.greenTextField.text=[NSString stringWithFormat:@"%d",(int) ( colors[1]*255)];
self.blueTextField.text=[NSString stringWithFormat:@"%d",(int) (colors[2]*255)];
self.transTextField.text=[NSString stringWithFormat:@"%d",(int) ( colors[3]*255)];
}
- (IBAction) sliderChanged:(id) sender
{
UISlider *slider=(UISlider*) sender;
int colorIndex=slider.tag;
colors[colorIndex]=slider.value;
[self calcColors];
}
- (IBAction) bob:(id)sender
{
}
@end
Subscribe to:
Posts (Atom)